
Chapter 13.1
Setting up properties and units
Before a lease can be signed or a rent charge posted, the books have to know what is being rented: the building, the spaces inside it, and where its money goes. This chapter turns the module on, prepares the chart of accounts, adds a property and enters its units, then puts the property in a group and gives every unit a field of Summit's own.
When you finish this chapter you will be able to:
- Explain what the Property Management module adds to the books and who can switch it on.
- Set the books-wide defaults: mode, state, statement period, banks and bank roles, and read the Outside services card.
- Prepare a chart of accounts that was not built for rentals.
- Add a property and read the accounts it creates.
- Enter units in the grid, and correct a row the software refuses.
- Group properties, and add a custom field of your own to every unit.
What the module is, and how it is switched on
Property Management is an add-on module. It adds properties, units, leases, a rent ledger for each tenant, deposits, late fees, work orders, inspections and owner statements. Underneath, every rent charge is an ordinary invoice and every payment an ordinary receipt. The module organises them by building and by unit, so you never have to invent a customer per apartment.
The module has two switches. The plan must include it, and the owner of the books must turn it on in Settings → Property Management. Only the owner can turn it on. Anyone else who opens the module before that sees "Property Management is not turned on for these books. Ask the owner of these books to turn Property Management on."1
Once it is on, the module's overview page carries an On chip beside its title and the line "Own portfolio (the books own the properties), on since 11/01/2026", and a new group appears in the sidebar. A Find a page box sits at the top of the group: type a few letters of a page name (for example units) to jump to it.
The overview, Property Management in the sidebar, is the operations board of the whole portfolio. A strip of readouts gives occupancy, units, rent collected this month, what tenants owe and open work orders. Below it the Tenancy lifecycle follows a unit from vacant to let and back again, in four lanes (Lease-up, Occupied, Delinquency, Turnover); each stage is a tile with a count, and a lamp on the tile says whether anything is waiting there. A fifth row in the same panel, Office, holds the desk tiles: Today board, Inspections, Month-end close and Trust reconciliation. Further down, Last 12 months charts the trend and Needs attention collects the cards that want a decision. Every tile and card opens the page where its work is done. On the day the module was switched on, with no property yet, every count was zero; the picture was taken later, when the rest of this volume had filled the board in.
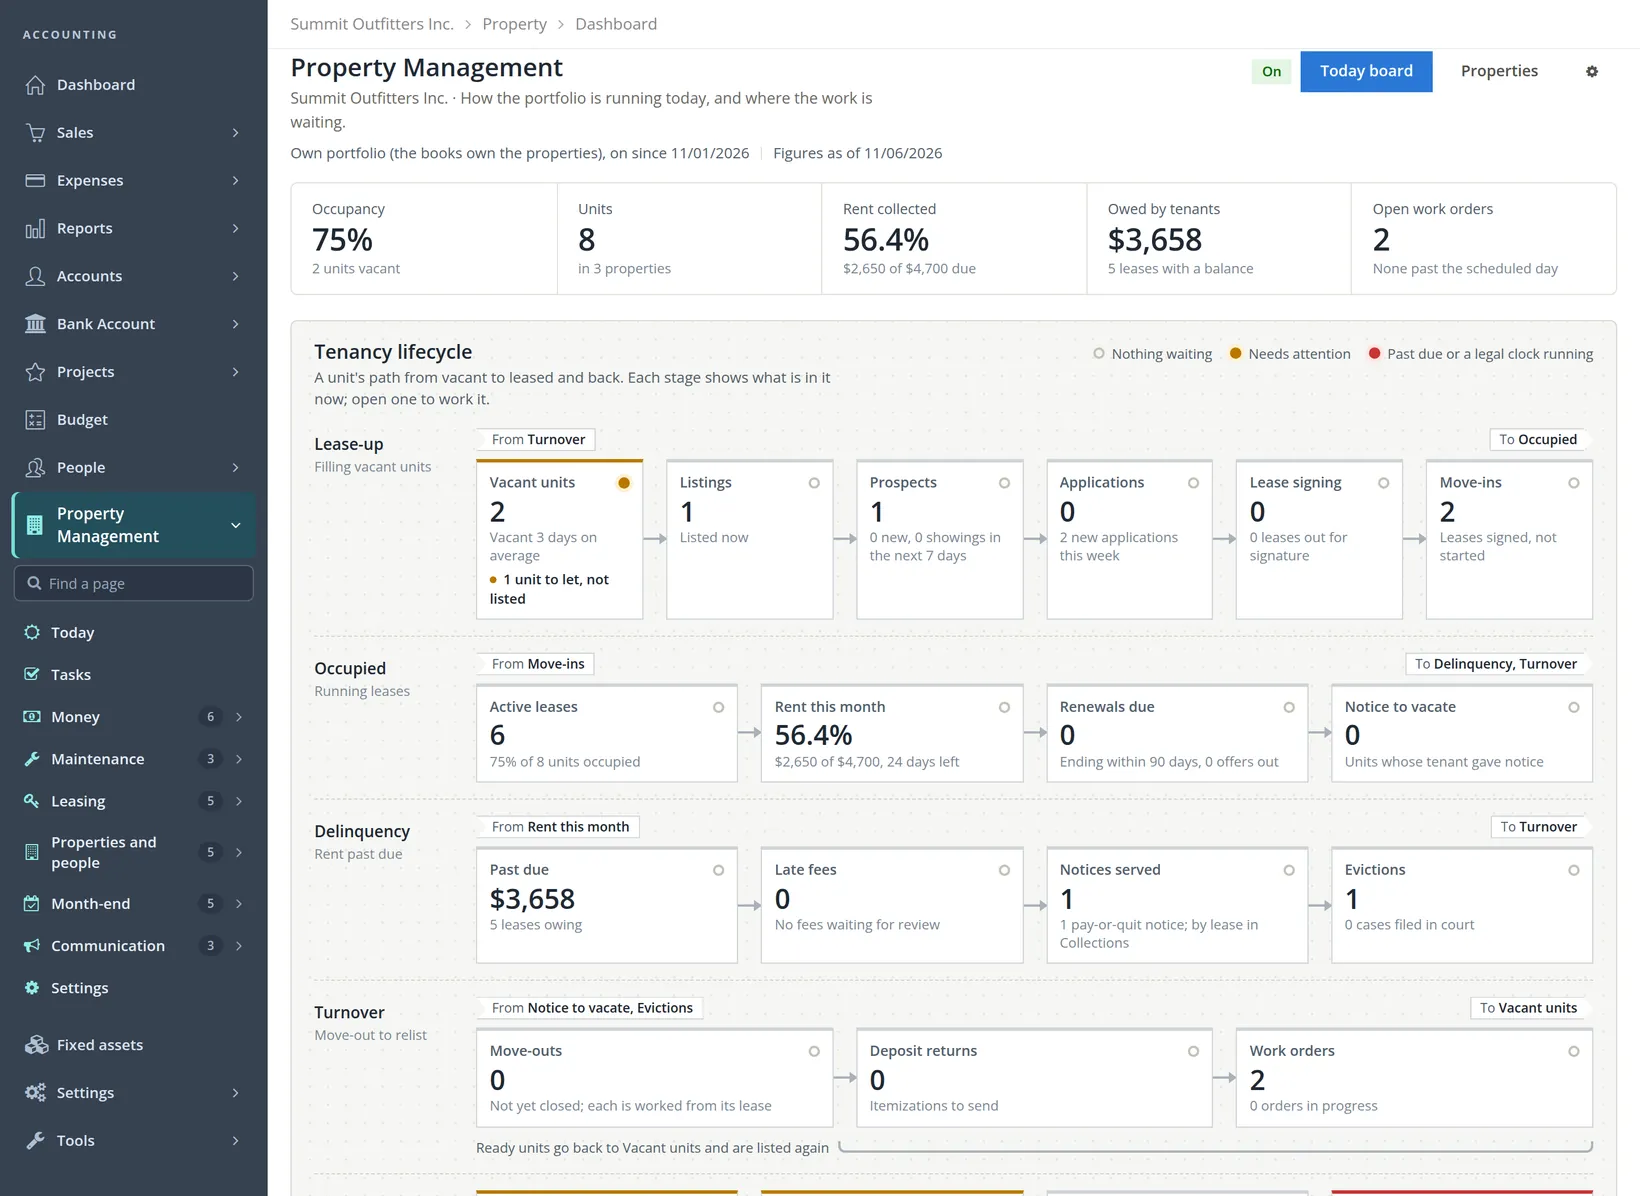
The sidebar groups follow the year of a rental office. Each later chapter of this volume works in one or two of them:
| Sidebar entry | Pages in it | Chapters |
|---|---|---|
| Today, Tasks | the day's work; to-dos and requests | 13.10 |
| Money | Rent roll, Outstanding balances, Late fees, Collections, Deposits, Approvals | 13.4 to 13.8 |
| Maintenance | Work orders, Inspections, Vendors | 13.8, 13.9 |
| Leasing | Listings, Prospects, Applicants, Draft leases, Renewals | 13.3, 13.4, 13.7 |
| Properties and people | Properties, Units, Tenants, Owners, Property groups | 13.1 (this chapter), 13.4, 13.11 |
| Month-end | Management fees, Trust reconciliation, Owner statements, Month-end close, Report packs | 13.12, 13.18 |
| Communication | Announcements, Documents, Portal access | 13.13 |
| Mode | Use it when | Chapters |
|---|---|---|
| Own portfolio | The company owns the buildings; rent is the company's income. | Most of this volume (Summit's own buildings) |
| Managed for owners | The company runs buildings that belong to other people and keeps their money in trust. | 13.11 and 13.12 (one property managed for an outside owner) |
The mode is set for the whole books, and a single property can override it on its own Settings tab. Summit stays on Own portfolio.
Set the books-wide defaults
Open Settings → Property Management → General (the cog on the overview goes to the same page). The module's settings have two menus that lead to the same pages: a row of six tabs across the top (General, Fees and bills, Leasing, Tasks and inspections, Documents and messages, Data), and a sub-menu of fourteen entries under Property Management in the Settings sidebar (General, Late fees, Management fees, Templates and so on, down to Import and Custom fields). Use whichever is nearer. The General tab opens with a Plan card that confirms the module is included and on. Every property follows these values unless its own page says otherwise, so a few minutes here save a field on every property and every lease.
- 1
Check the mode and type the state
The state is a two-letter code. It matters more than it looks: "Deposit deadlines, late fee caps and notice days follow it." The module started Summit on PA; Summit's building is in Oregon, so type OR.
- 2
Choose the day the statement period ends
Pick 31 (the last day of the month) for calendar months. Rent rolls and owner statements close on that day.
- 3
Choose the default banks, then Save changes
Deposits are held in takes security deposits and prepaid rent; Rent is banked in takes rent, fees and other income. Summit keeps deposits apart in its Money Market Savings account and banks rent in Operating Checking. The pickers list only the books' bank accounts; on Summit's books they also show Owner Trust Checking and Tenant Deposit Trust, the two trust accounts used for the house managed for an outside owner (Chapter 13.11). The page answers Saved.
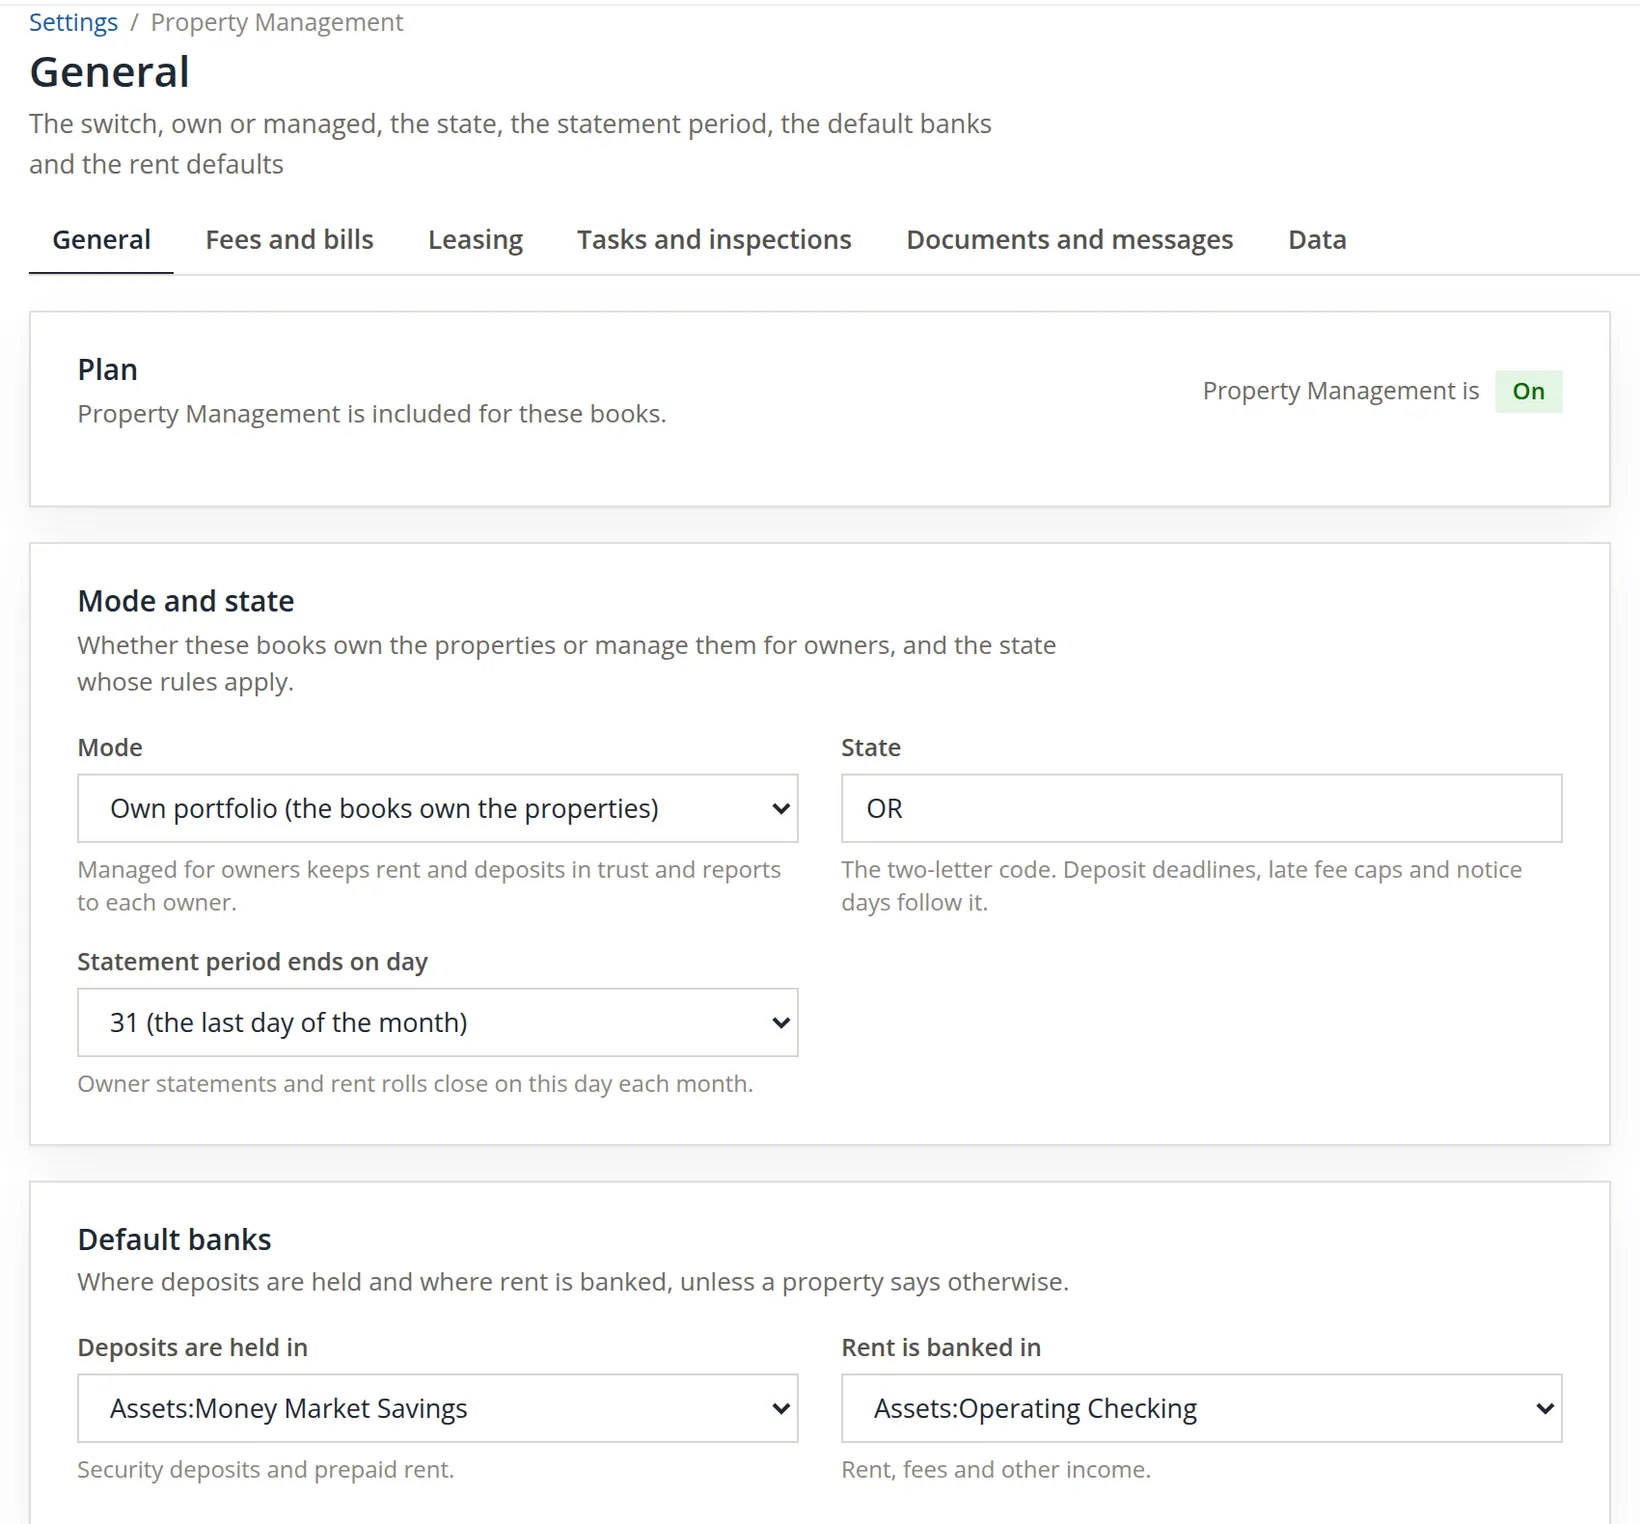
A security deposit is the tenant's money, not yours. Holding it in a separate bank account makes the month-end tie-out (deposits owed equals cash held) a two-number check. Several states require it.2
Below the banks, the same form holds four more cards that later chapters use. Leases and rent sets what a new lease starts as (Fixed term), keeps late fees waiting for review, and blocks portal payments while an eviction is pending (Chapter 13.6). Accounting holds one picker, Rent concessions account: where a credit given from a lease (Financials → Give a credit) is taken off income. Leave it on Each property's own Rent Concessions (recommended); each property then gets its own Revenue:<property>:Rent Concessions account on its first credit (Chapter 13.5). Vendors holds one switch, Require current vendor insurance on work orders: on, a vendor whose insurance has expired cannot be put on a work order; off, the page only warns (Chapter 13.8). Payments holds the payment rules: oldest charge first, prepayments applied to the next charge, partial payments accepted (Chapter 13.5). All of them are saved by the one Save changes button at the foot of the form, beside the note "Applies to every property unless the property says otherwise."
Two cards sit under that button, outside the form, and each has a button of its own.
- 4
Set the bank roles, then Save bank roles
The defaults above say where new money is posted. The roles say which bank plays which part when money goes out or is routed: "Refunds are written from the deposit bank; tenant receipts route to the operating bank; the company bank takes the books' own money." Summit names Money Market Savings as the Deposit bank and Operating Checking as the Operating bank, the same pair as its defaults. The Company bank stays Not set; it takes management fees and owner draws, which matter only for a managed property (Chapters 13.11 and 13.12).
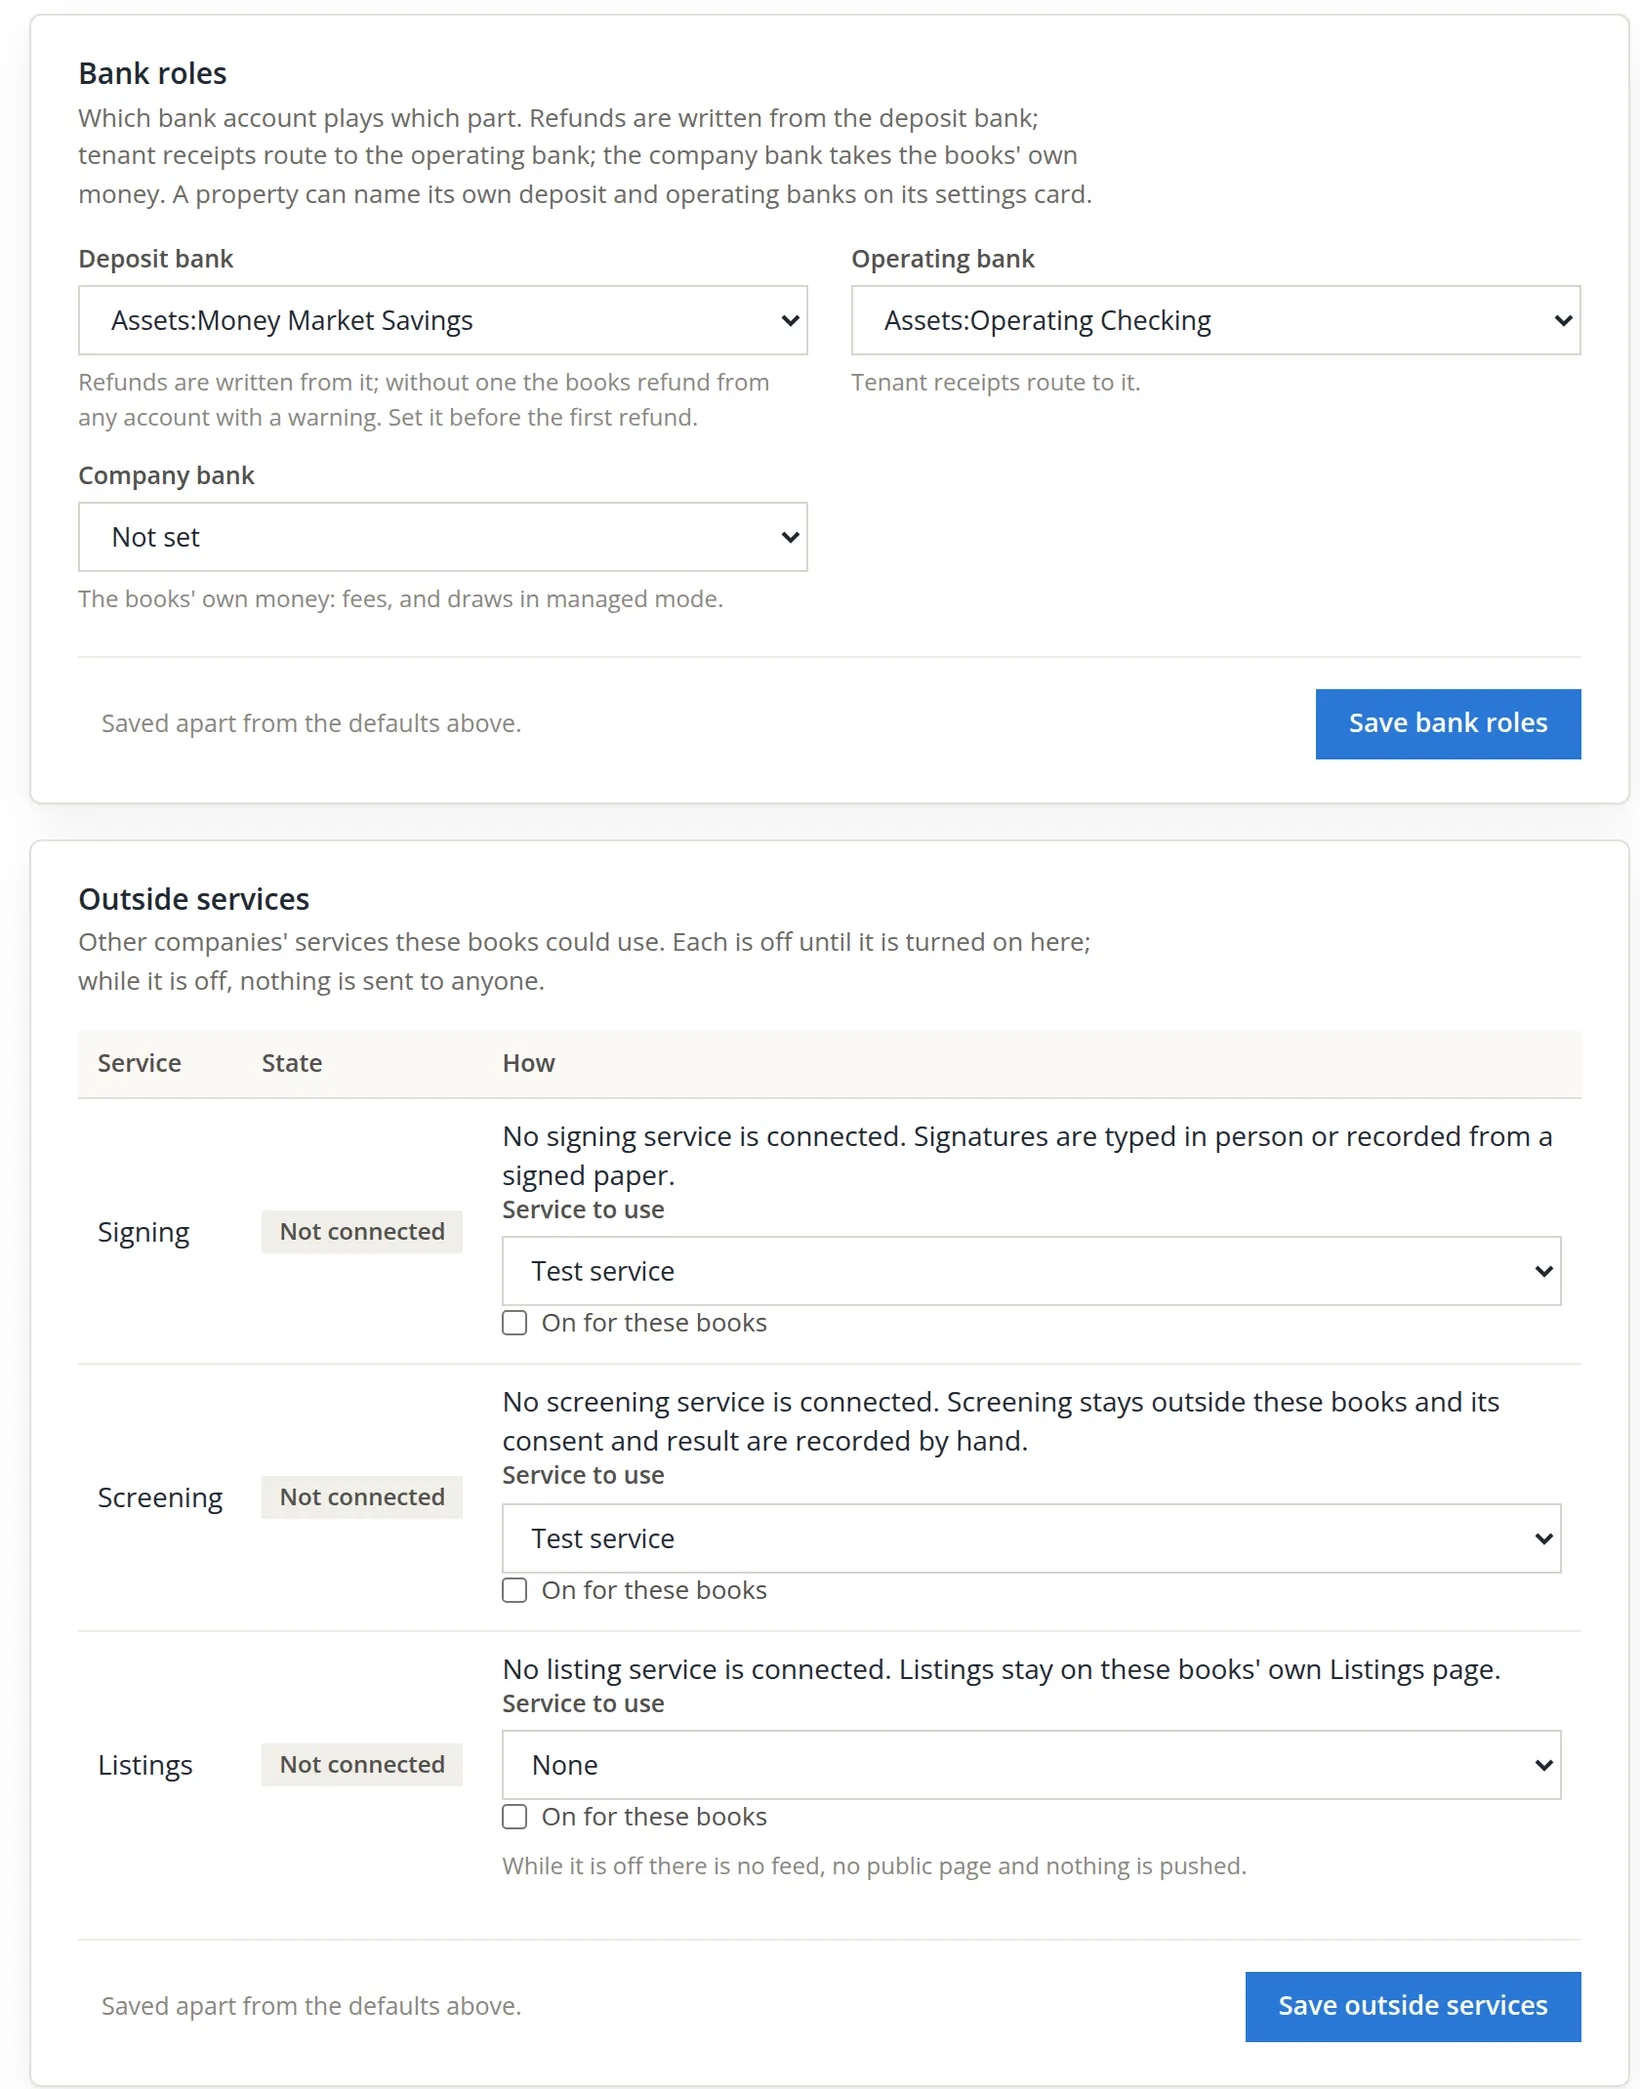
Outside services lists the other companies' services the books could use: electronic signing, tenant screening and listing sites. "Each is off until it is turned on here; while it is off, nothing is sent to anyone." Summit leaves all three off. Signatures are then typed in person or recorded from a signed paper, screening is done outside the books and recorded by hand, and listings stay on the books' own Listings page. The Listings row is the exception worth knowing: switched on, even with no listing service connected, it gives the books a listing feed and public pages for their listed units (Chapter 13.3).3 The card underneath, Outside service events, logs every call to or from such a service; on Summit's books it reads "Nothing has gone to or come from an outside service."
The General tab has three separate saves: Save changes for the form, Save bank roles and Save outside services. Each one saves only its own card (the cards say "Saved apart from the defaults above."). Change a role and click Save changes, and the role is not saved.
The first try, and what the software caught
Property Management → Properties and people → Properties opens an empty list with Add the first property. Summit's bookkeeper filled in the form and clicked Add property. Nothing was saved.
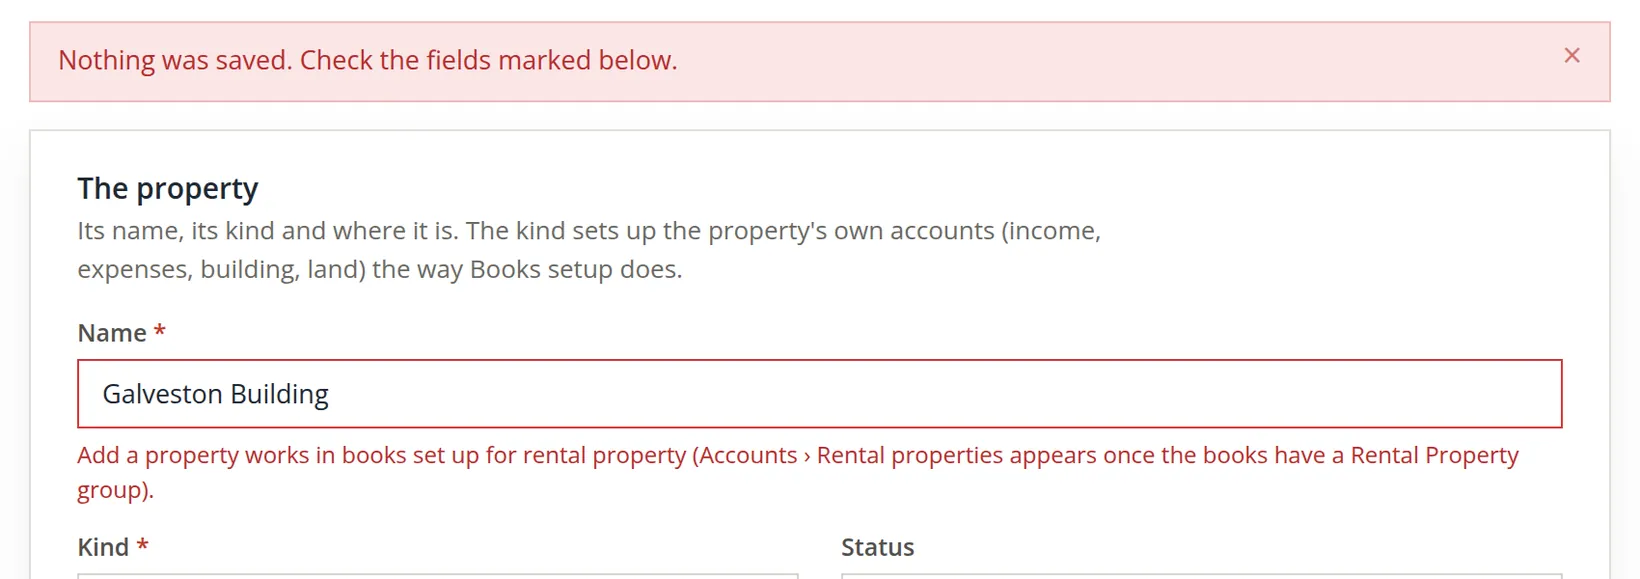
Why? A property is not only a record; it is a set of accounts. Adding one builds, under existing headers, a group of asset accounts (land, building, improvements, depreciation), a deposits liability, a revenue group and an expense group. Summit's chart was built for a store. It has Revenue, but no Rental Property group under Assets, and its expenses sit under Operating Expenses rather than a top-level group called Expenses. The module needs four things:5
| The module needs | Summit had | What we added (Chapter 5.1 shows the dialog) |
|---|---|---|
| Assets → Rental Property | missing | Rental Property, number 1600, detail type Long Term Assets, a header |
| Top-level Revenue | Revenue (4000) | nothing |
| Top-level Expenses | Operating Expenses (6000) only | Expenses, number 8500, top level, a header |
| Liabilities → Security Deposits Held (optional) | missing | Security Deposits Held, number 2250, Other Current liability, a header |
Prepare the chart of accounts
- 1
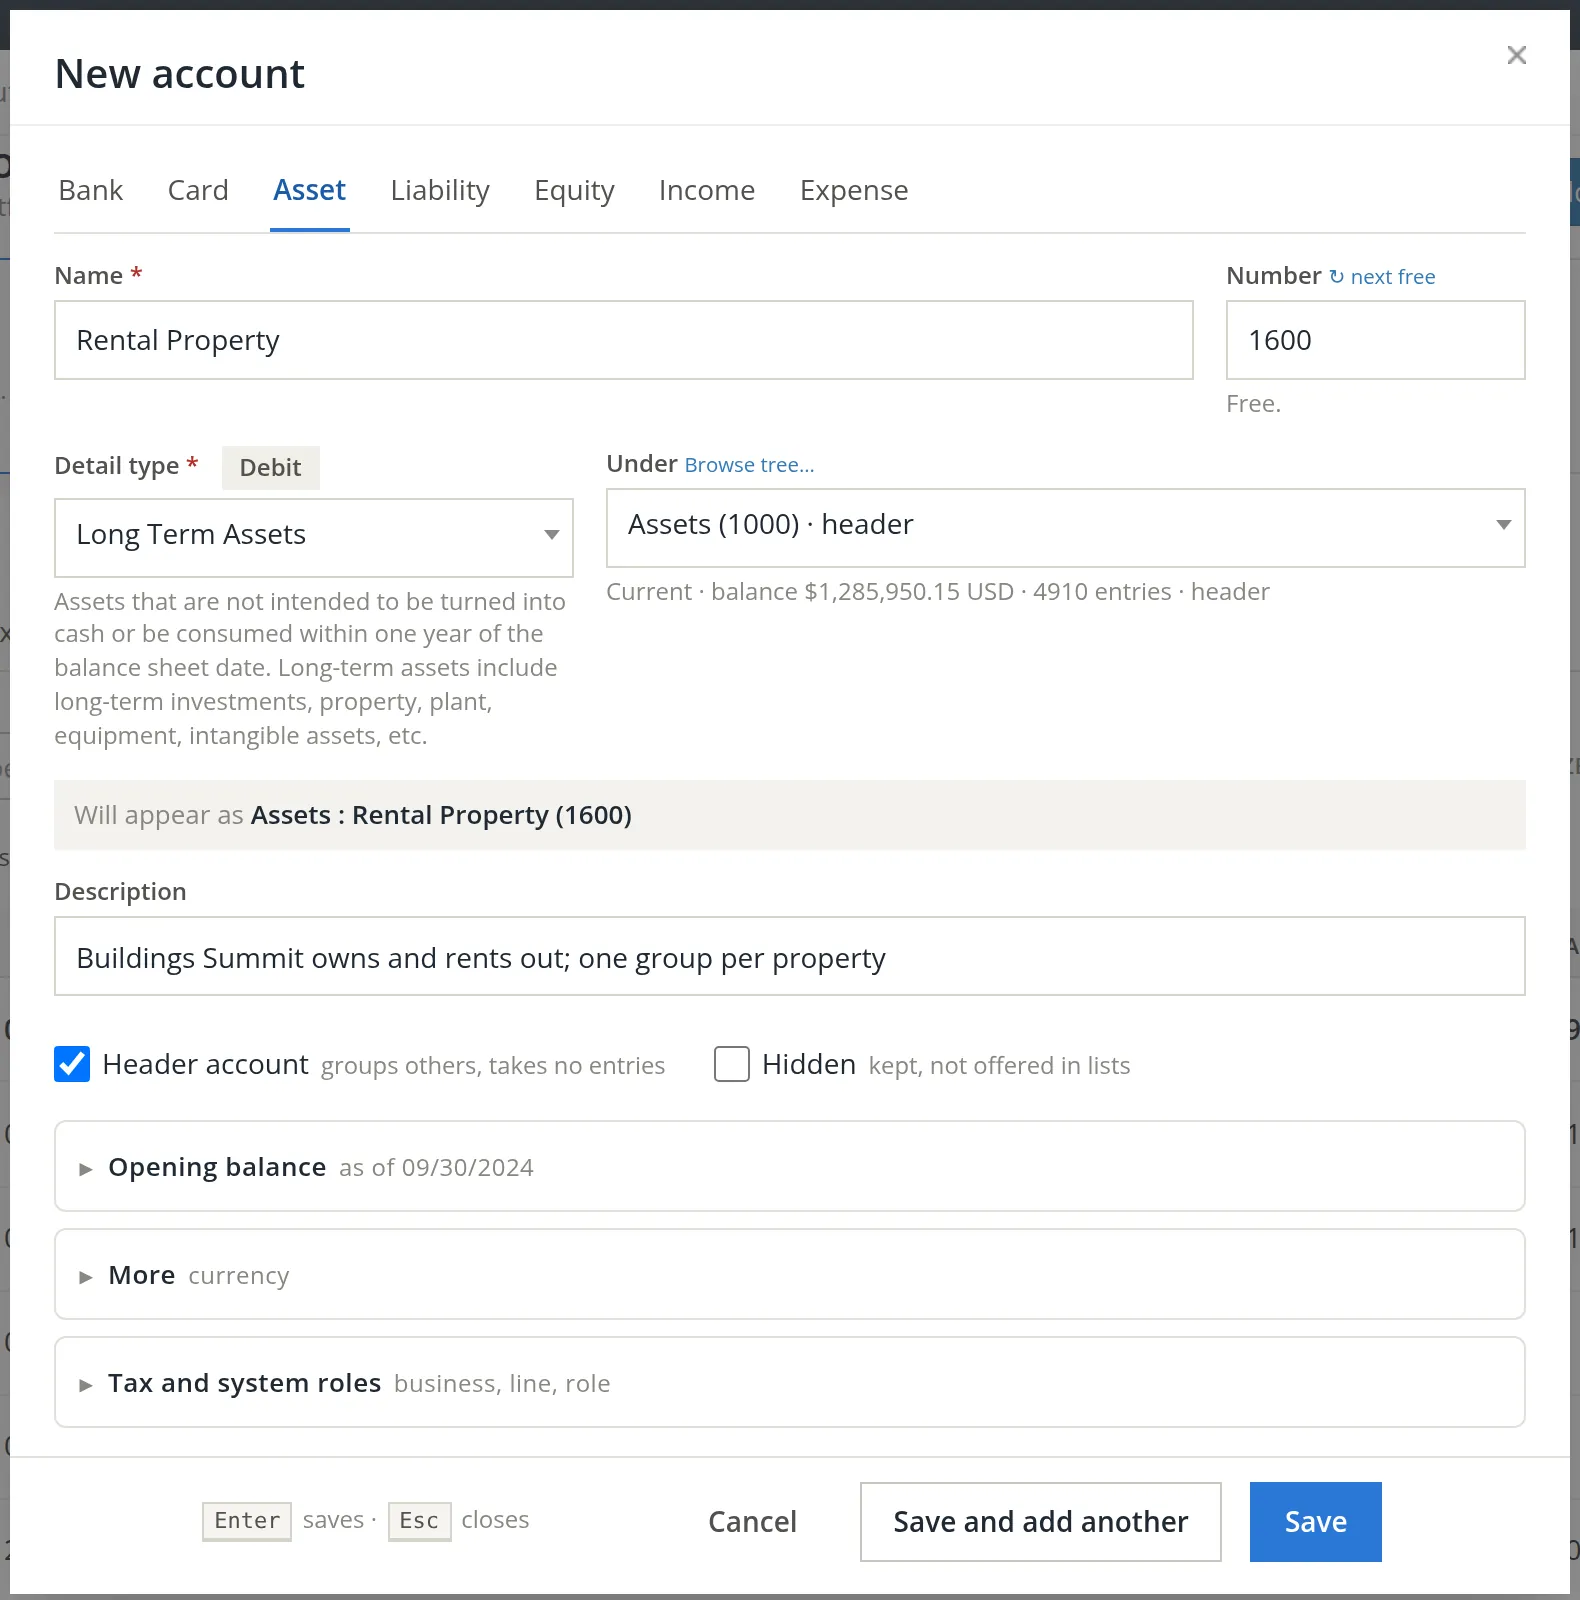
Open Accounts → Chart of Accounts and click Add account
Choose the Asset tab. Name the account Rental Property, put it under Assets (1000), give it a long-term asset detail type and tick Header account. The grey line shows where it will land: Assets : Rental Property (1600).
- 2
Add Security Deposits Held on the Liability tab
Under Liabilities (2000), detail type Other Current, a header. Check the grey line before saving: it must read Liabilities : Security Deposits Held.6
- 3
Add Expenses on the Expense tab
Under Top level (no parent), detail type Expense, a header. It sits beside Operating Expenses and will hold the building's costs, kept apart from the store's.
The module finds these groups by their path: Assets:Rental Property, Expenses, Liabilities:Security Deposits Held. "Rental Properties" or "Rental Expenses" will not be found. Renaming Operating Expenses to Expenses would also work, but it would change every store report; adding a new group is the gentler fix.
Add the property
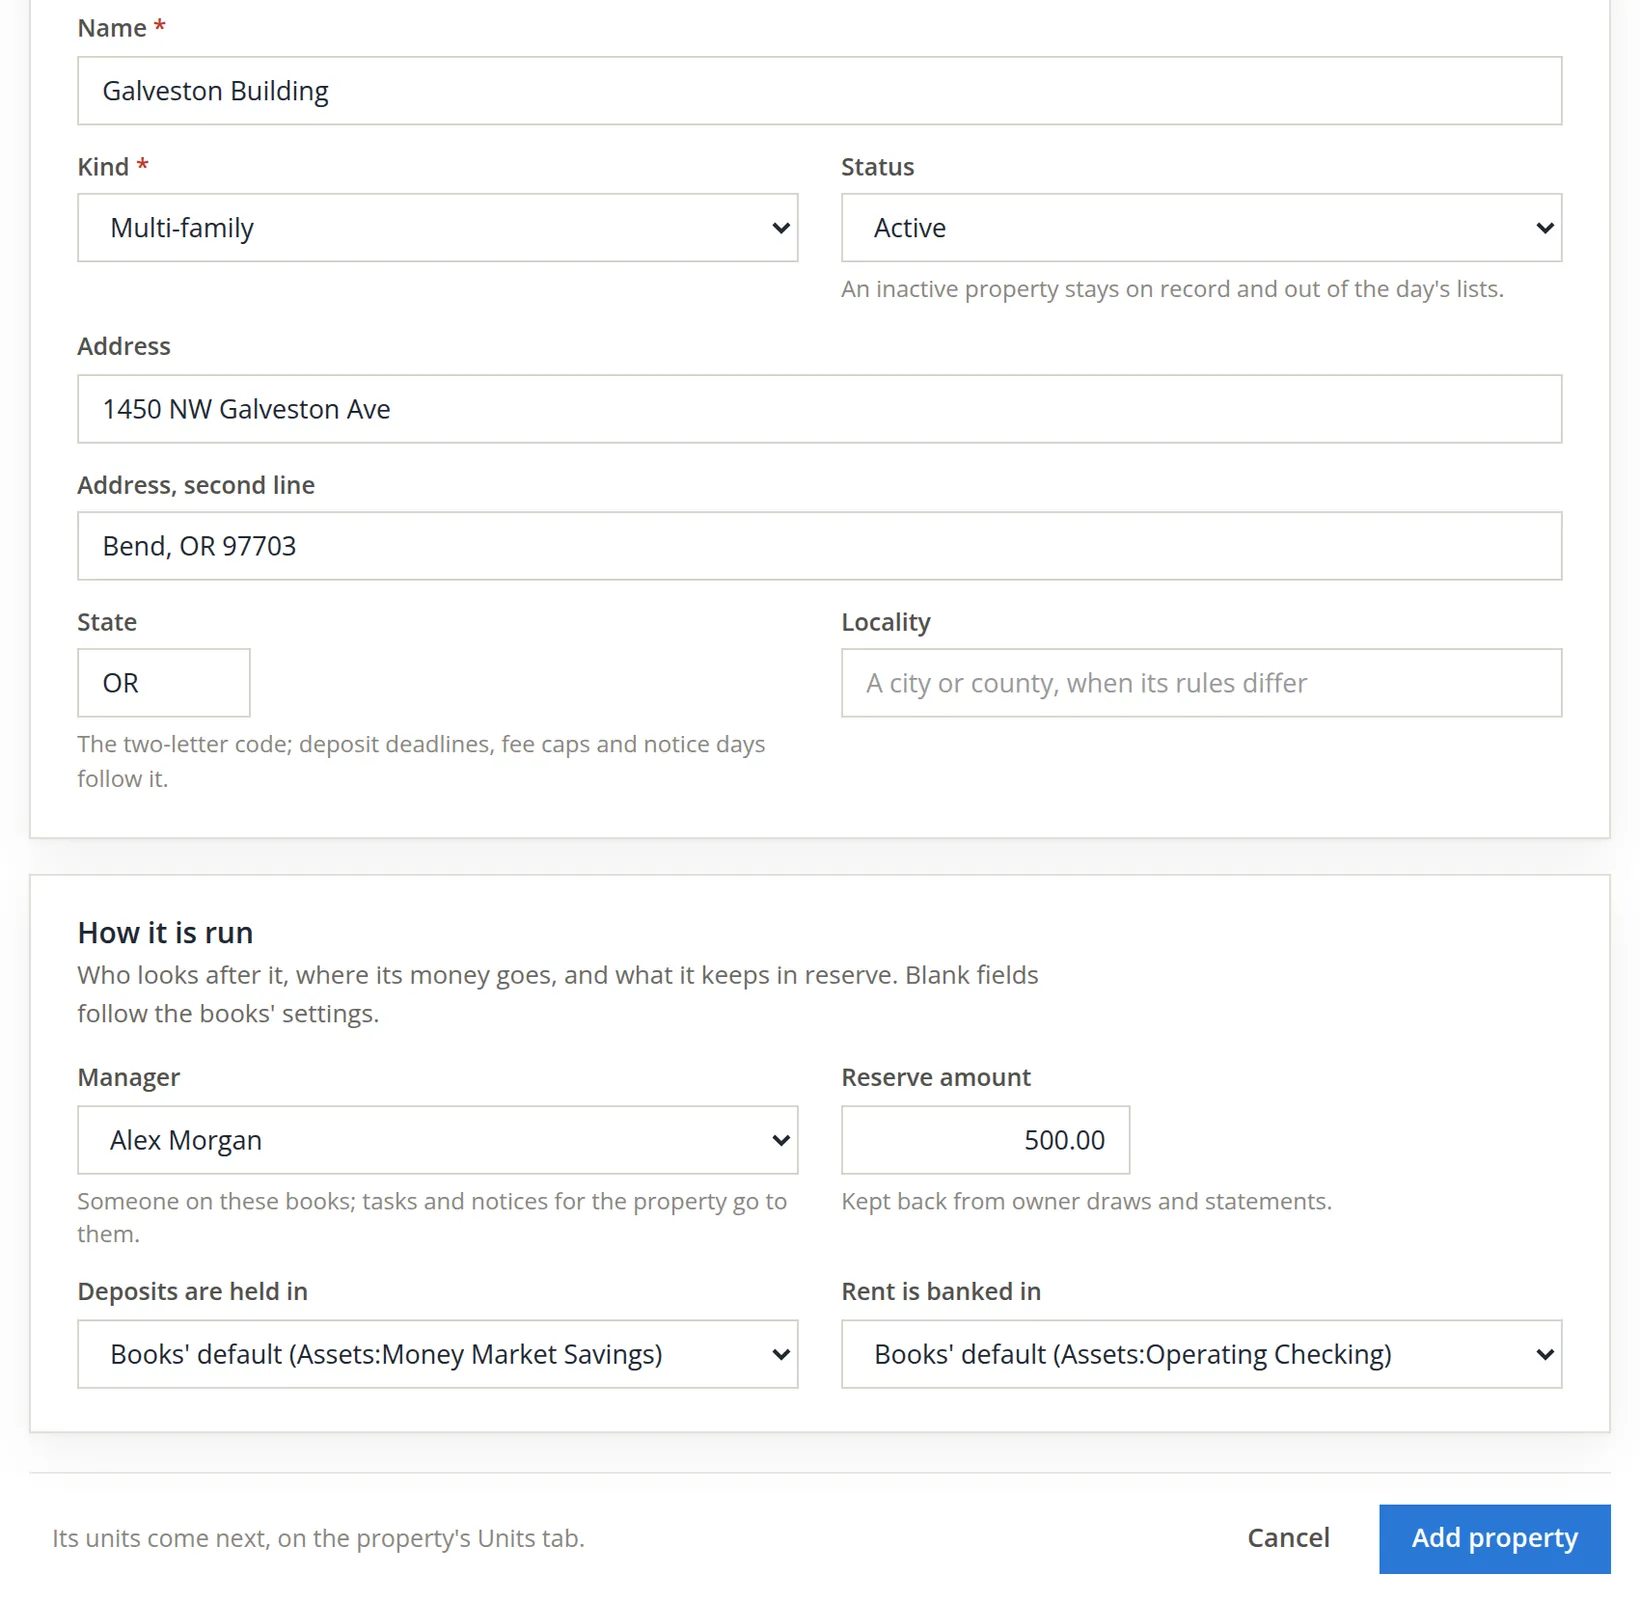
Back on Properties, click Add property again. The form has two cards: The property (what and where) and How it is run (who and which banks). Blank fields in the second card follow the books' settings from Procedure A.
- 1
Name it and choose the kind
The kind is not a label only: "The kind sets up the property's own accounts ... the way Books setup does." The eight kinds follow the property types of Schedule E, line 1b. Two apartments and a storage room over a shop is Multi-family; a building rented wholly to shops would be Commercial.7
- 2
Type the address
The form has two address lines, a state and a locality, but no separate city or ZIP box. Put Bend, OR 97703 on the second line. Use Locality only when a city or county has its own rules (for example its own deposit or notice rules).
- 3
Fill in how it is run, then Add property
Summit sets Alex Morgan as manager and a $500.00 reserve. The reserve matters most for managed properties, where it is "kept back from owner draws and statements"; for an owned building it is a reminder of the repair cushion.
The save opens the property's own page with a green banner, "Property added. Add its units next on the Units tab.", and its Activity tab records the first line of its history: Property added with 22 accounts.
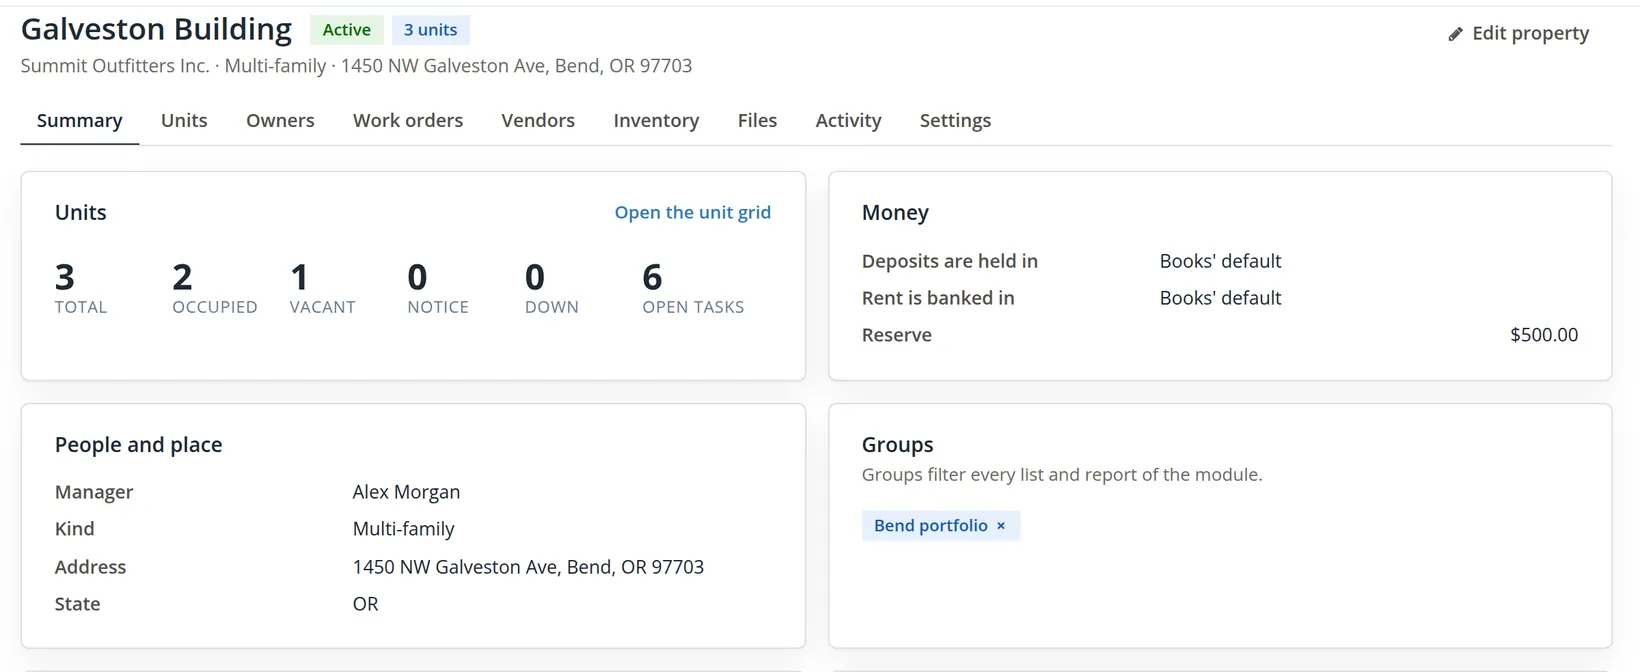
Every property page has the same row of tabs. The ones this chapter uses are Summary, Units, Activity and Settings; the rest are filled in by later chapters.
| Tab | What it holds | Chapter |
|---|---|---|
| Summary | unit counts, banks and reserve, people and place, groups, open tasks, inspections, recent activity | 13.1 |
| Units | the unit grid (Procedure D), with a Meter readings view beside it | 13.1, 13.9 |
| Owners | who owns the property and in what shares | 13.11 |
| Work orders | repairs on the property | 13.8 |
| Vendors | the repair people who work there, with their insurance | 13.8 |
| Inventory | the building's own equipment (roof, boiler, water heater) and each unit's appliances, with warranties | 13.9 |
| Files | leases, inspections, notices, statements, insurance and photos kept with the property | 13.4, 13.9 |
| Activity | what happened and what was said, newest first; notes, calls, e-mails and visits | 13.1 |
| Settings | the form of Procedure C again, plus the property's own banks for refunds and receipts, its mode, an application fee and its payment rules; Edit property opens it | 13.1, 13.11 |
The Owners tab appears once the books, or any one of their properties, are run in Managed for owners mode. Summit's books manage one house for an outside owner (Chapter 13.11), so every property page shows it, Galveston Building's too; on Galveston it simply has no owners to list.8
Reading the 22 new accounts
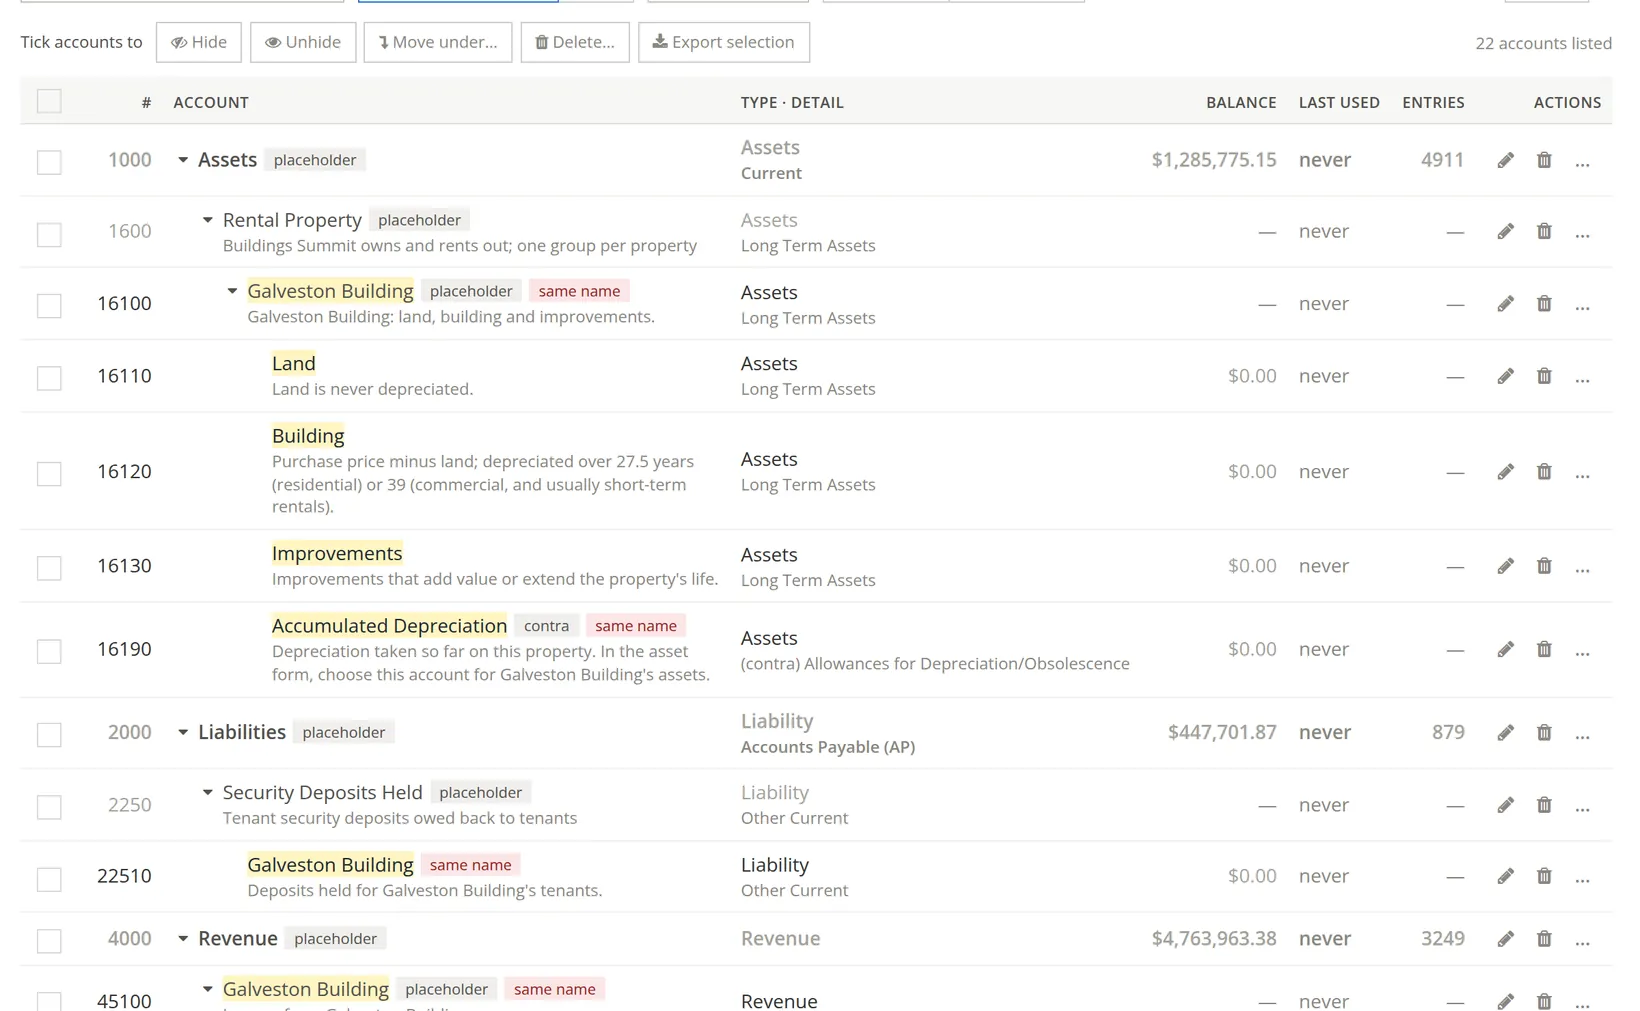
Search the chart for Galveston to see what the property built. Every account carries the property's name, so a Profit and Loss by account becomes a Profit and Loss by building.
| Group | Numbers | Accounts |
|---|---|---|
| Assets:Rental Property:Galveston Building | 16100 to 16190 | Land, Building, Improvements, Accumulated Depreciation (5 with the group) |
| Liabilities:Security Deposits Held | 22510 | Galveston Building (1) |
| Revenue:Galveston Building | 45100 to 45140 | Rents, Late & Other Tenant Fees, Tenant Reimbursements, Forfeited Deposits (5) |
| Expenses:Galveston Building | 85100 to 85119 | Advertising, Cleaning & Maintenance, Insurance, Legal & Professional, Repairs, Supplies, Property Taxes, Utilities, Depreciation, Other (11) |
| Total | 5 + 1 + 5 + 11 = 22 | |
The five-digit numbers come from the module's catalog, so a second property lands at 16200, 45200 and 85200. The expense rows line up with the lines of Schedule E, which is why the Tax Report (Chapter 6.8) can place them without help. Rows the catalog only makes for a mortgage, a property manager or short stays were left out.
To read these accounts property by property later, open Reports and, in the Taxes group, Rental Properties: one column per property, on the lines of Schedule E (or Form 8825), for the tax year you choose. Chapter 13.16 reads it in full.
The chart's Needs attention card counts accounts with the same name in different places. The property's asset, deposit, revenue and expense groups are all called Galveston Building, so they are flagged. They are not duplicates: each sits under a different parent.9
Enter the units
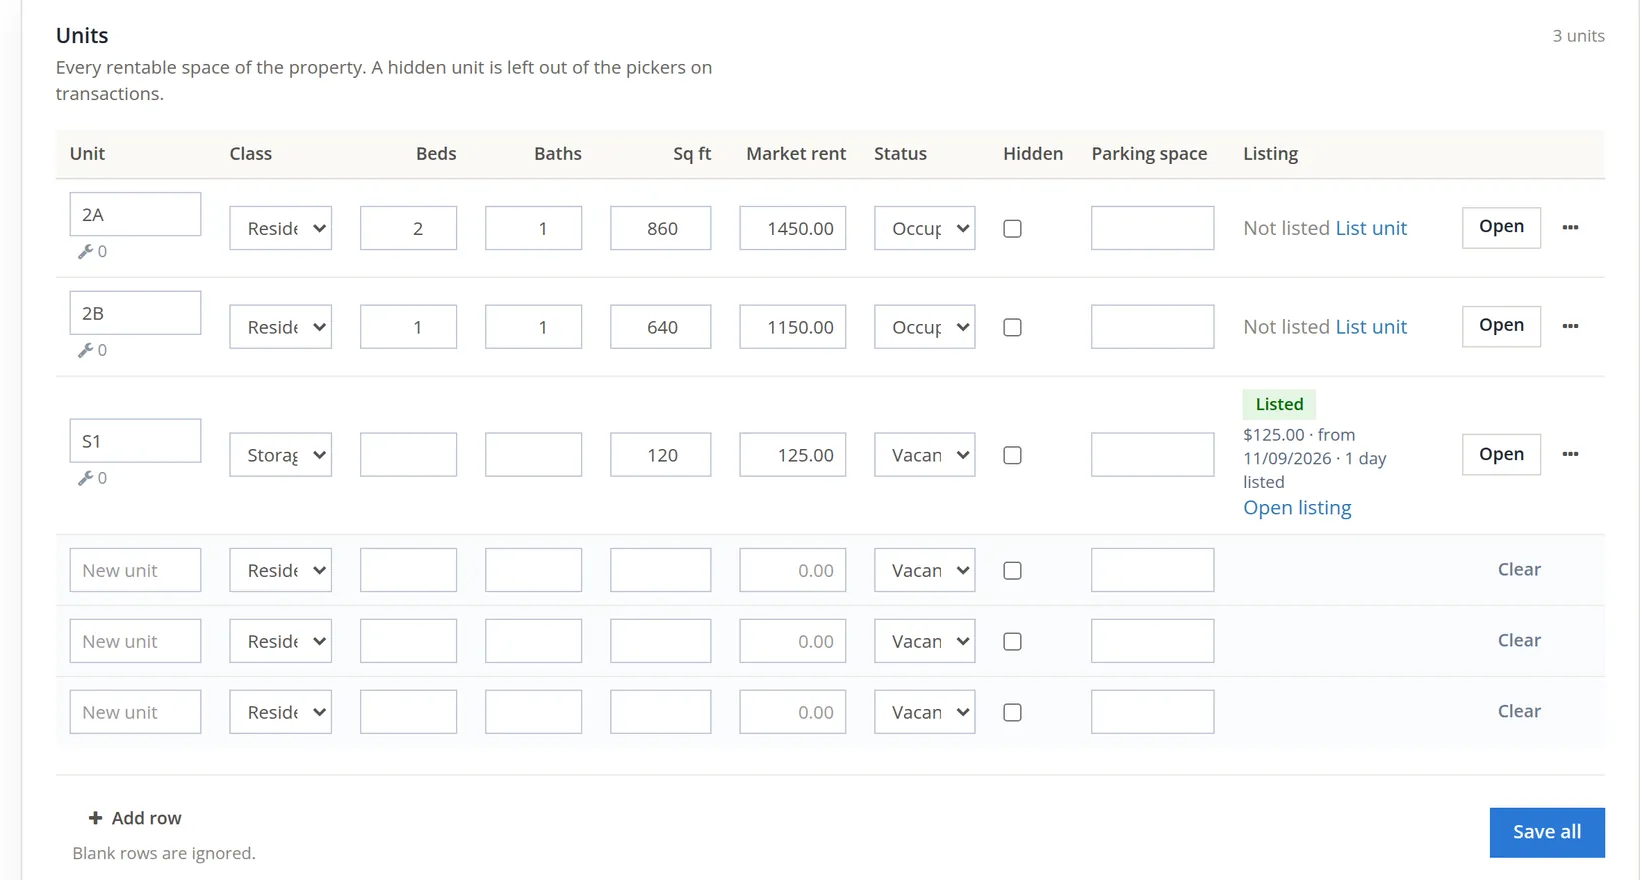
Open the property's Units tab. It is a grid: one row per unit, with three blank rows ready and Add row for more. Blank rows are ignored. Summit's three spaces:
| Unit | Class | Beds / baths | Sq ft | Market rent |
|---|---|---|---|---|
| 2A | Residential | 2 / 1 | 860 | $1,450.00 |
| 2B | Residential | 1 / 1 | 640 | $1,150.00 |
| S1 | Storage | -- / -- | 120 | $125.00 |
| Gross potential rent per month | $2,725.00 | |||
- 1
Type one unit per row and click Save all
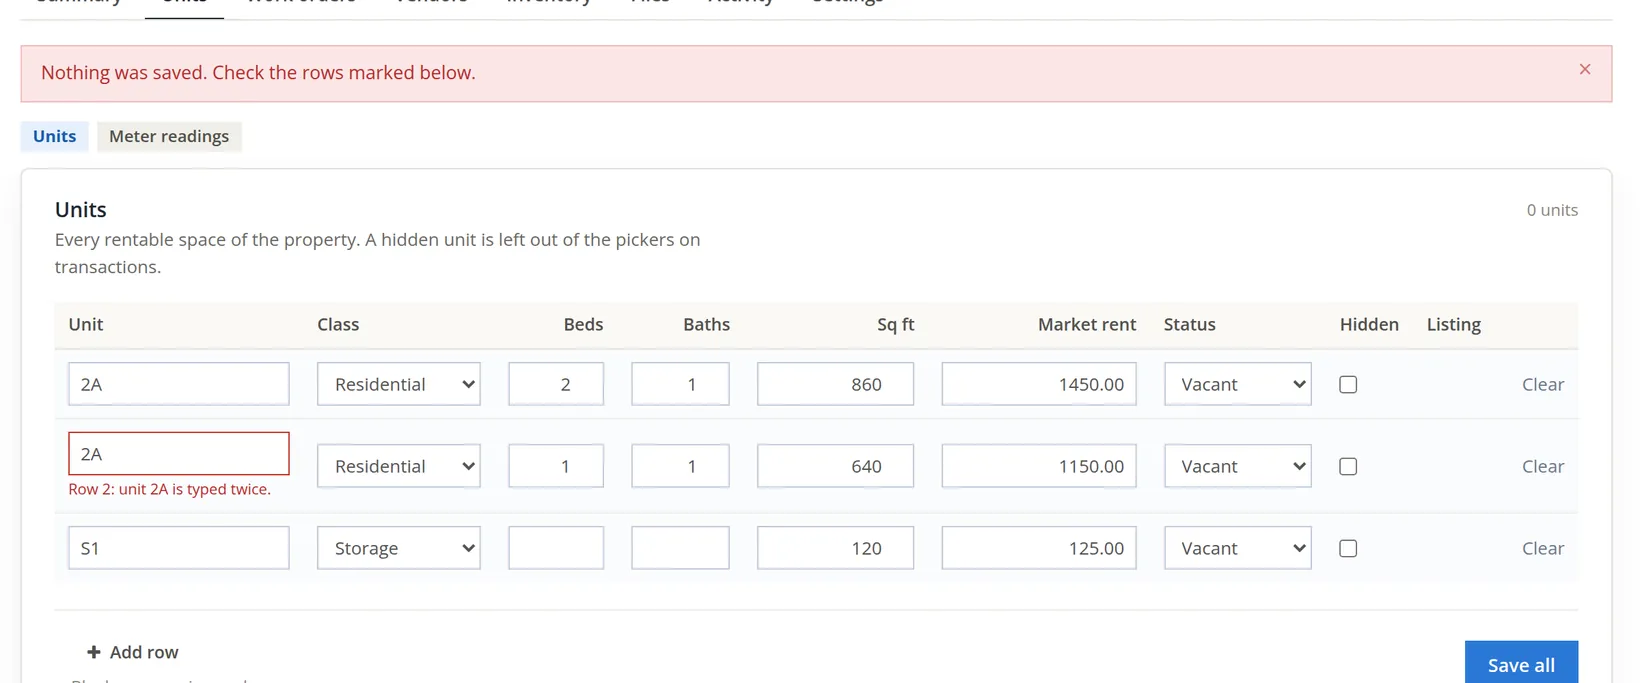
Leave Status on Vacant: a lease will change it. The bookkeeper copied the first row to save typing and forgot to change the number on the second.
- 2
Correct the row and save again
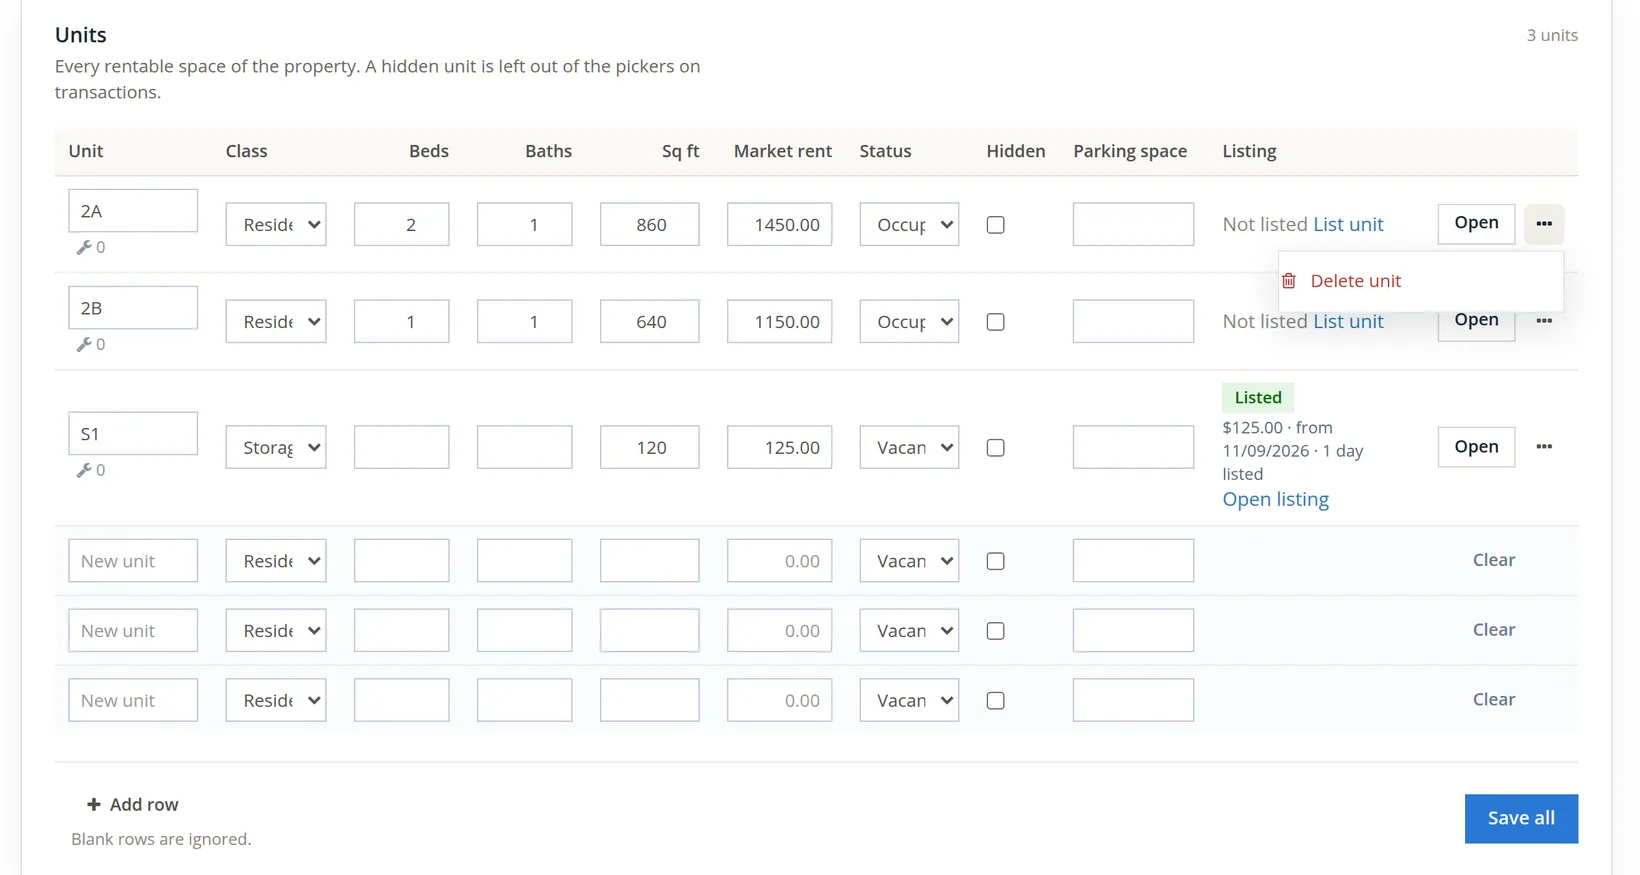
The rows keep what you typed. Change the second 2A to 2B and click Save all. The page answers 3 units were saved. A unit number must be unique within a property; two different buildings can each have a 2A. Each saved row now ends with an Open button, which opens the unit's own page, and a More button (···) whose one item is Delete unit; a blank row ends with Clear instead.
- 3
Check the module-wide list
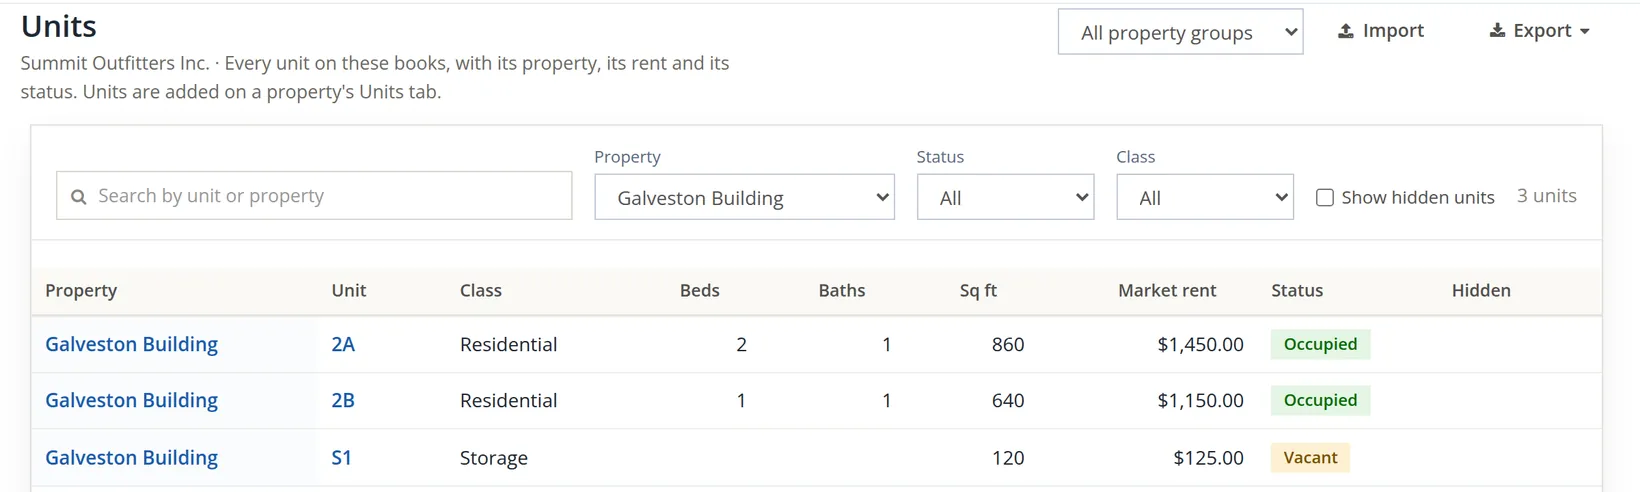
Properties and people → Units lists every unit of every property, with filters for property, status and class. Units are not typed in here; the page says so and sends you to the property's tab. Its Import button loads many units at once from a spreadsheet, which Chapter 13.2 uses for a whole building.
Put the property in a group
A property group is a named set of properties you look at together: a town, an owner's portfolio, the buildings one person runs. Once the books have a group, every list page of the module (Properties, Units, Rent roll, Work orders, Deposits and the rest) gains a picker in its header, All property groups; choose a group and the list shows only its properties. With one building the group changes nothing yet. Summit makes it now because it plans to buy a second building, and it wants one switch that shows "our own Bend buildings" and leaves out the house it only manages for an outside owner (Chapter 13.11).
- 1
Open Properties and people → Property groups
The first time, the page reads "No groups yet." with a button Add the first group. Click it (later the button is called Add group).
- 2
Name the group and decide who may use it
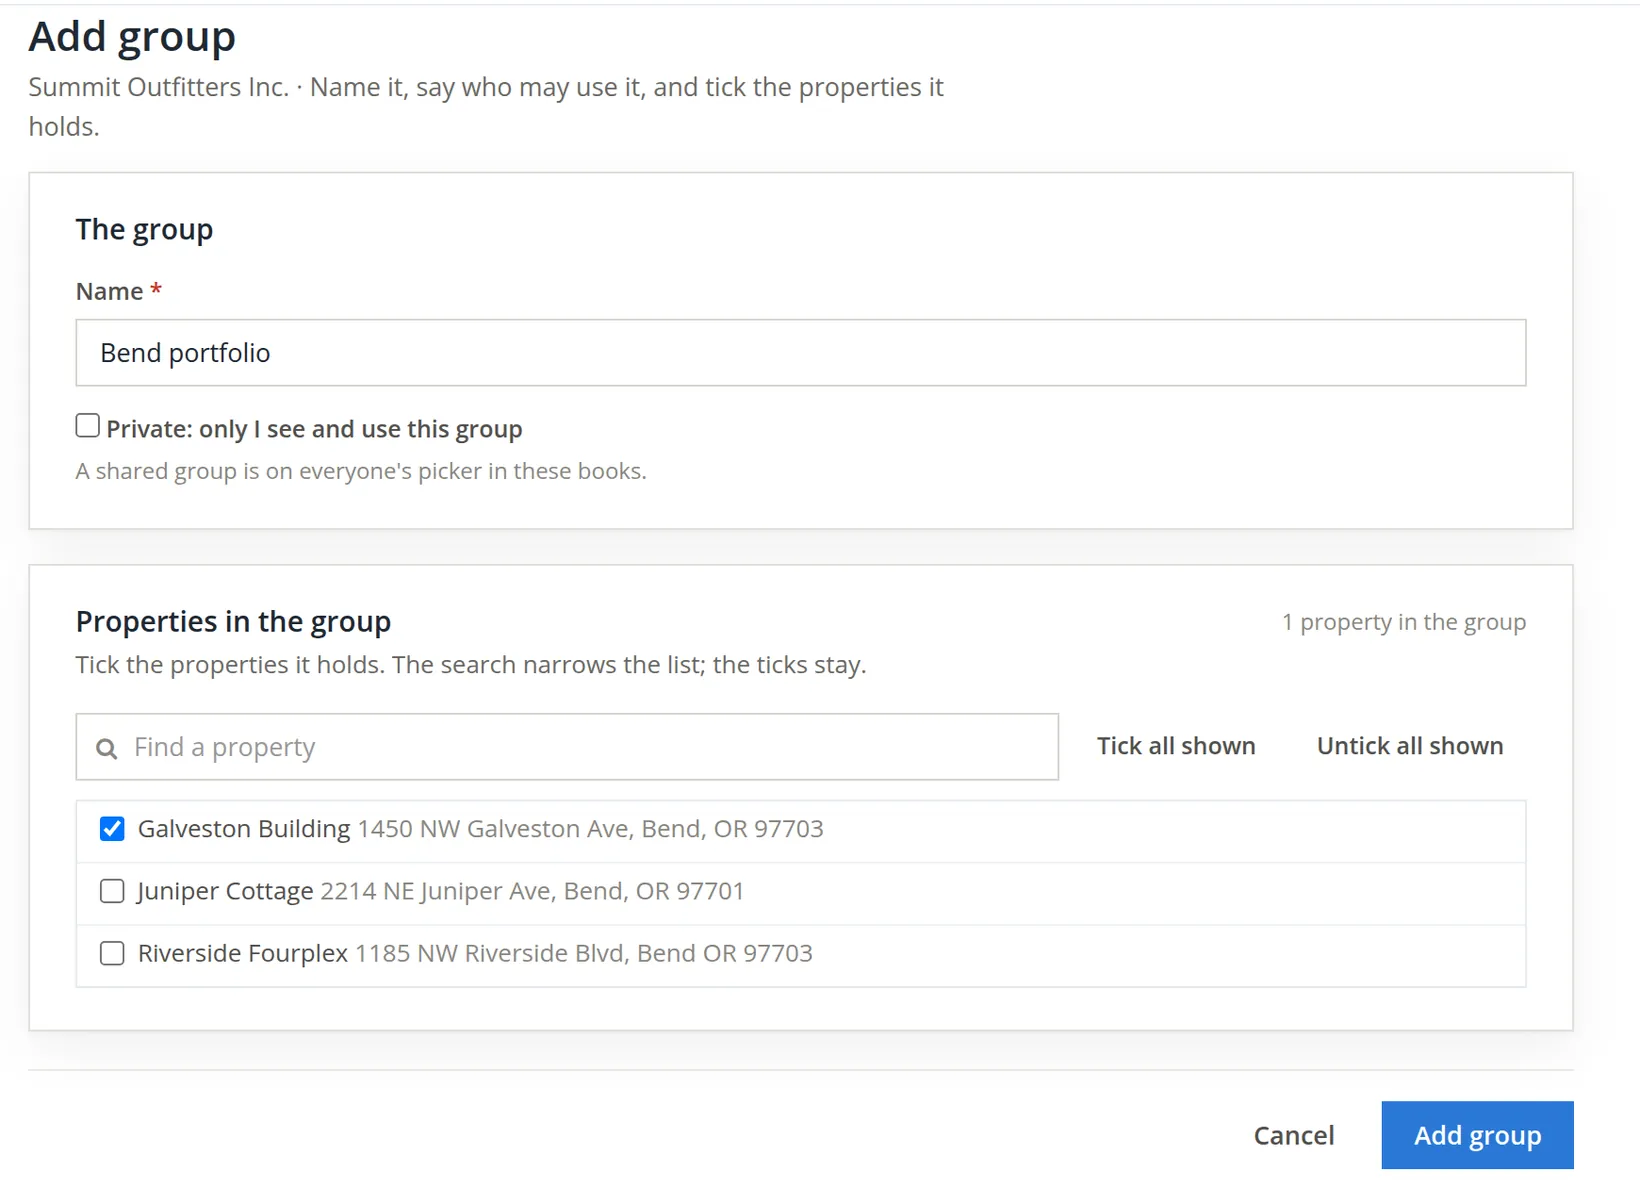
Type Bend portfolio. Leave Private: only I see and use this group clear: "A shared group is on everyone's picker in these books." A private group suits a personal working list; the office's own groupings should be shared.
- 3
Tick the properties, then Add group
Tick Galveston Building and leave the others clear. With a long list, type in Find a property to narrow it; ticks you have made stay while you search. The list page answers Group added. and shows the row Bend portfolio · Shared · 1 · You.
- 4
Add later buildings by editing the group
A few days later Summit bought the Riverside Fourplex (Chapter 13.2). On the groups list the bookkeeper clicked the group's name (the row's More menu, ···, holds the same Edit, and Delete), ticked Riverside Fourplex and clicked Save changes. The page answered Saved. and the row now counts 2 properties. The same can be done from a property's side: its Summary tab has a Groups card, with an Add to a group picker and an × on each group's chip to take the property out again.
To use the group, choose Bend portfolio in the picker on any list, or click Show properties on the group's row. The list then holds only the group's properties (the Properties list adds a chip, Group: Bend portfolio, whose × clears it), and the choice stays as you move from list to list until you pick All property groups again.10
Make a group for every question you ask more than once a month: "what is vacant downtown?", "what does the leasing agent look after?", "which buildings carry the bank loan?". A property may sit in several groups at once, and deleting a group never deletes its properties: the page asks "Remove the group ...? Its properties stay."
Add a field of your own: the parking space
Every office keeps a few facts the software has no box for. At Summit it is the parking space: each apartment comes with one numbered space behind the building, and the lease will name it. A custom field adds such a box to every record of one kind: properties, units, leases, tenants, prospects, applicants or listings.
- 1
Open Settings → Property Management → Data → Custom fields and choose the record type
The Data tab has two sub-tabs, Import (Chapter 13.2) and Custom fields; the Settings sub-menu also has a Custom fields entry that goes straight there. Custom fields opens on Properties. A parking space belongs to a unit, so click the Units sub-tab. It reads "No custom fields for units yet. Add one: a parking space, a gate code, a pet deposit paid." Click Add field.
- 2
Name it and choose the type
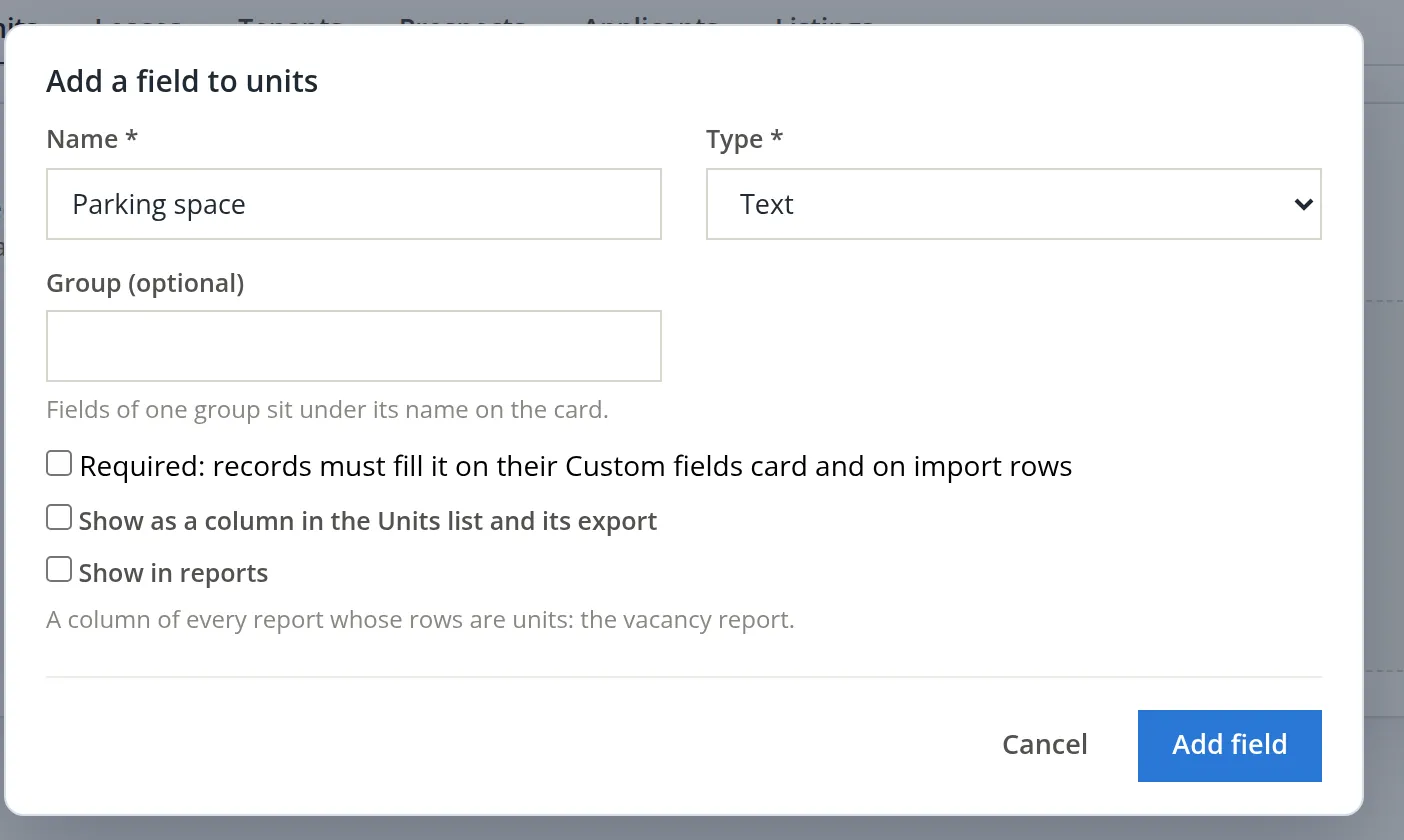
Name Parking space, type Text (Summit's spaces are numbered P-1, P-2, so a number field would refuse the letter). The other types are Long text, Number, Money, Date, Yes / No and Choice list. Group is optional: fields of one group sit together under its name on the card.
- 3
Leave the three boxes clear, then Add field
The first box, Required: records must fill it on their Custom fields card and on import rows, would force every unit, and every row of a units import, to carry a value; the storage room S1 has no parking space, so Summit leaves it optional. Show as a column in the Units list and its export and Show in reports (a column of the vacancy report) can be ticked later. The page answers "Field added: Parking space." and lists it as Text, Active, used on 0 records.
- 4
Fill it in, unit by unit
The field appears in two places at once. Each unit's page (the row's Open button) gains a Custom fields card, below Inventory, with its own Save. And the property's Units tab grid gains a Parking space column, so a whole building can be filled in one pass and saved with Save all. An import file fills it too, with a column named cf:Parking space (Chapter 13.2).
A required field is checked on every record's card and on every import row, so one forgotten value refuses a whole import. And once a field holds values it is locked in shape: "A field with values cannot be removed or change its type." To retire it, use Deactivate: "Deactivated fields keep their values and leave every card."
Before you write the first lease
- [x] Property Management shows On, in the right mode.
- [x] The state on the General tab is the building's state.
- [x] Deposit and rent banks are chosen, and the deposit bank is separate if your state asks for it.
- [x] The chart has Assets:Rental Property, a top-level Expenses and Liabilities:Security Deposits Held.
- [x] The property's activity says it was added with its accounts.
- [x] Every unit is on the Units tab with its class and market rent, and the count matches the building.
- [x] The bank roles name a deposit bank before the first refund, and every Save button you needed was clicked.
- [x] The property sits in the groups the office uses, and those groups are shared.
- [x] The custom fields you need exist on the right record type, and only facts every record has are Required.
Check your understanding
1. A staff member opens Property Management and reads "Ask the owner of these books to turn Property Management on." What is wrong?
Answer
Nothing is broken. The module is in the plan but switched off, and only the owner of the books can switch it on, in Settings → Property Management.
2. Add property refuses with a message about a Rental Property group. What do you add, and where?
Answer
A header account named exactly Rental Property under Assets; and, if the chart has none, a top-level Expenses group (plus Liabilities:Security Deposits Held for deposits).
3. Why did one property add 22 accounts?
Answer
Five asset accounts, one deposit liability, five revenue accounts and eleven expense accounts, so that the building's income and costs are reported separately and map to Schedule E.
4. The units grid says "Row 2: unit 2A is typed twice." Were rows 1 and 3 saved?
Answer
No. The grid saves all rows or none. Fix row 2 and click Save all again.
5. What is Summit's gross potential rent for the building?
Answer
$1,450.00 + $1,150.00 + $125.00 = $2,725.00 a month.
6. You changed the deposit bank in the Bank roles card, clicked Save changes, and refunds still come from the old bank. Why?
Answer
The Bank roles card is saved by its own button, Save bank roles. Save changes saves only the form above it.
7. A colleague cannot find your group on their picker. What is the likely cause?
Answer
The group was made with Private ticked, so only its maker sees and uses it. Edit it and clear the box to share it.
8. Why did Summit leave the Parking space field optional?
Answer
Not every unit has a space (the storage room S1 has none), and a required field is checked on every unit's card and on every import row, so a blank would be refused.
Notes
- The practice user in these pictures is a member, not the owner, of Summit Outfitters Inc., so the module was switched on for the books before the pictures were taken. The switch, the mode and the date it was turned on are shown on the overview page; members with the Property settings permission may change the other settings, as shown in Procedure A. ↑
- Rules on where deposits must be held, whether they earn interest and how fast they are returned differ by state and sometimes by city. This manual is not legal advice; check the rules for the building's location. ↑
- On the practice books photographed here the Signing and Screening pickers offer a Test service, a stand-in that sends nothing outside the server. On working books those rows show the services the books can connect, and where there are none, only the line that no service is connected. ↑
- The picture was taken on an earlier release, whose message ended with a pointer to a page under the Accounts menu instead. The current message, quoted in the caption, names the missing group. The property-by-property figures are on Reports, in the Taxes group, under Rental Properties (Section 3). ↑
- The module checks that the books have Assets:Rental Property and the four top groups Assets, Liabilities, Revenue and Expenses directly under the root. Without the Expenses group its message is "These books don't have the Revenue and Expenses groups Add a property needs." Books created with rental property in the setup questions already have all of these. ↑
- The detail type list has two entries called Other Current, one for assets and one for liabilities. Choosing the asset one can move the account under Assets. If that happens, open the account with Edit, set Under to Liabilities and the liability detail type, and save; the message then reads "Liabilities:Security Deposits Held" changed. ↑
- The kinds are Single-family home, Multi-family, Vacation or short-term rental, Commercial, Land, Royalties, Self-rental and Other. A building where the business uses part and rents the rest is a mixed-use question for your tax preparer; the kind only steers the default accounts and the Schedule E line. ↑
- The tab appears when the books' mode, or the mode of any one of their properties, is Managed for owners, and only for members with the Rental owners permission. Books that only own their buildings do not see it. ↑
- The card's count grows with every property, because each property adds four accounts of the same name, and more with the accounts each of its groups holds (Rents, Land and so on). The flagged property groups are separate accounts under different parents; there is nothing to merge. ↑
- The group chosen on the picker is remembered for your sign-in and these books only; colleagues keep their own choice, and signing in again starts from All property groups. Groups also scope the module's announcements and report packs (Chapters 13.13 and 13.18). ↑